How to Build a Game and Learn C#
Self-Paced Workshop – Part 4
By Former Tech Elevator Instructor Matt Eland
In this final part of a four-part tutorial series we’ll complete our “Guess the Number” game that we’ve been developing.
This final tutorial brings everything together and also introduces the key concept of loops and shows you a way to generate random numbers in .NET.
By the time we’re done, you’ll have a working game where the program secretly selects a number between 1 and 100 and asks the player to pick numbers until they’ve guessed it.
Note: This series is based loosely on some of the content from the 1st week of Tech Elevator‘s 14 week C# curriculum
Our code as we last saw it
This was our code by the end of the last tutorial:
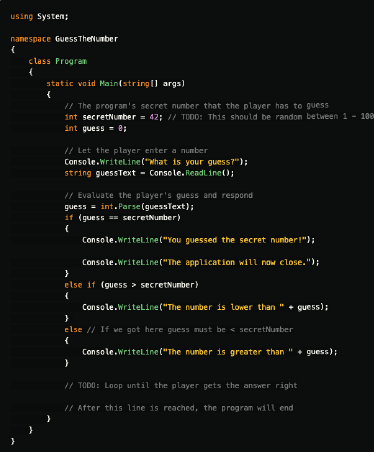
At present, the application lets us guess a number and then tells us if that number is correct, too high, or too low. You currently only get a single guess, and the number you’re trying to guess is always the same.
Let’s fix that, starting with the problem of the player only getting one guess.
While Loops
If we want the user to keep guessing numbers until they guess the correct one, we’ll need something called a loop.
When writing code, often we’ll want to either do something a specific number of times or even do something continuously until a specific condition is met. In C# we have a surprising number of ways of writing loops, but one of the simplest types of loops will work fine for our application here: the while loop.
A while loop will do something while a condition is true. So, for example, while the user hasn’t guessed the number, ask the user what number they want to pick and then tell them if their guess was right, high, or low.
In fact, that’s exactly what we want to do. Let’s do this by going to where we declared our guess variable (not guessText) and adding a pair of lines after that:

If this looks a little like an if statement from the last tutorial, that’s because they’re very closely related. While an if statement would look like if (guess != secretNumber) instead we use the while keyword.
The while loop will execute the code between it’s { }’s as long as the condition in the parentheses is true at the beginning of the loop.
A quick note on != – this is very closely related to == meaning two things are equals, but instead != indicates not equal. So here we’re essentially saying “while the guess is not equal to the correct answer”.
You may have noticed that we haven’t closed our loop yet. We’ll need to add a matching } to the program for the compiler to be happy, so let’s do that now.
Add a } to the line just before the final comment in the application.
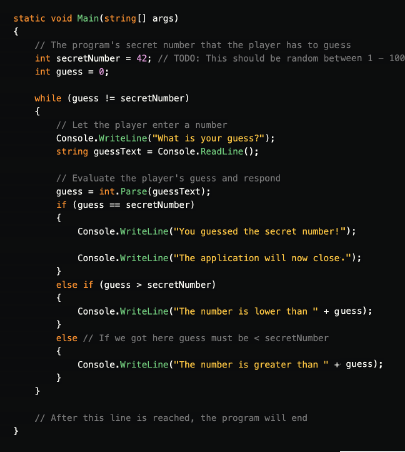
Your Main method should now look like this:
Click Next to continue.
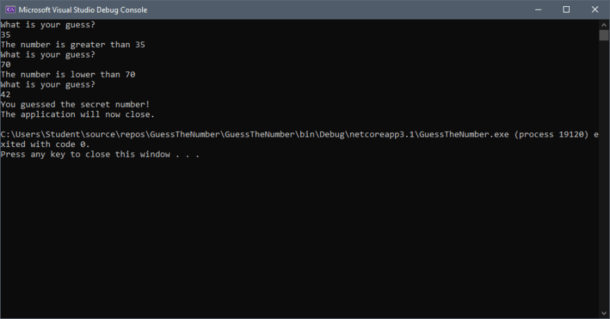
And when we run it, you should be able to guess numbers until you arrive at the secret number (which is still always 42)
Click Create when ready and your project will be created.
Randomization
Now that we’ve got everything working properly in the loop, we have one final step: our program needs to secretly pick a random number when it runs for the first time.
To do this, we’ll introduce a new part of .NET development: the Random class.
Lets replace the int secretNumber = 42; line at the top of our program with the following two lines:

These final two lines complete our program, but what do they do?
The first declares a new variable named randomizer that will store a Random class instance, which is then created and assigned into the randomizer variable.
This syntax and classes in general are beyond the scope of this tutorial series (and are something that we devote entire weeks of our curriculum to at Tech Elevator), but for now understand that a class is a collection of related functionality and data around some sort of programming concept.
In our case, the Random class contains a lot of related methods around random number generation, and that’s exactly what we use it for on the second line. int secretNumber = randomizer.Next(1, 100); generates a random integer between 1 and 100 and stores it into our secretNumber variable.
With that, our program is now able to generate a random number.
Putting it All Together
Let’s take a step back and look at our program as a whole:
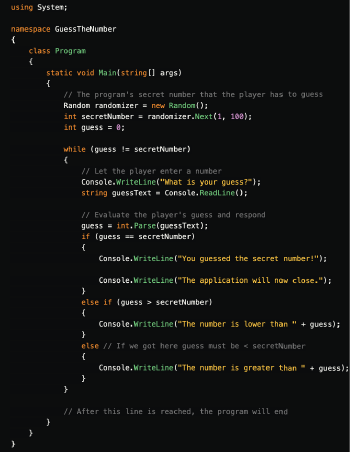
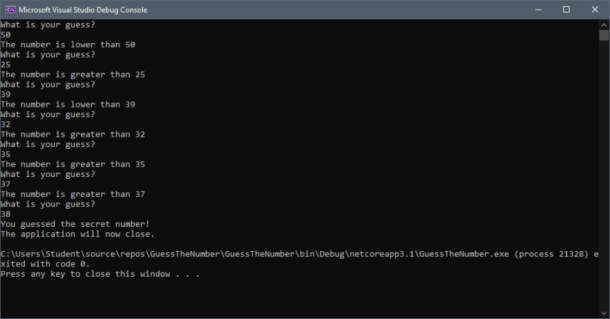
Here our program picks a random number. We then loop until the user’s guess is equal to that number. Each time we loop the player is prompted to guess a number. The text they type in is then parsed into an integer which can be compared to the secret number. The program then compares the guess to the secret number and displays an appropriate response.
What’s Next?
Congratulations! If you followed along, you wrote a fairly simple console game in C#.
This app, while short, illustrates some key programming concepts:
- Variables
- Expressions
- Basic Data Types
- If / Else Statements
- Loops
- Console Input and Output
While this was just a small taste of C# and .NET development, it should give you a feeling for what it is like to work with code and structure programs. On a more personal note, however you wind up learning, I wish you the best success. I can’t imagine my life without programming and the ability to be able to imagine something and then make it a real thing by writing on a computer is something that still amazes me after 3 decades of writing code.
If you’d like to learn more, there are plenty of books, articles, and courses on software development. Of course, I have to plug Tech Elevator’s 14 week C# and Java curriculum. Both are centered around learning full stack development with JavaScript and Vue.js on the front-end. Both emphasize learning by building things with regular individual exercises, pair assignments, and larger projects. Tech Elevator also supports students through this journey by giving them ready access to veteran industry professionals (such as myself) who are heavily invested in their success.
If you’d like to learn more about Tech Elevator, I strongly encourage you to take a free mini-aptitude test or check out a number of our other Learn to Code resources.
On a more personal note, however you wind up learning, I wish you the best success. I can’t imagine my life without programming and the ability to be able to imagine something and then make it a real thing by writing on a computer is something that still amazes me after 3 decades of writing code.
Matt Eland
 Matt has worked on services, desktop applications, single page JavaScript applications, mobile apps, and web applications in various .NET, Java, and JavaScript technologies for 30+ years. He loves mentoring and writing about software development.